Suzuki GSX-R 1000 Service Manual: Oil cooler / oil cooler hose inspection and cleaning
Refer to “exterior parts removal and installation” in section 9d .
Oil cooler hose inspection
Inspect the oil cooler hoses for any damage and oil leakage. If any defects are found, replace the oil cooler hose with a new one.

Oil cooler inspection
- Remove the oil cooler guard (1).

- Inspect the oil cooler for oil leakage. If any defects are found, replace the oil cooler with a new one. If the fins are bent or dented, repair them by carefully straightening them with the blade of a small screwdriver.

- Reinstall the removed parts.
Oil cooler cleaning
- Remove the oil cooler guard (1).
- Remove the oil cooler mounting bolts.

- Blow out any foreign matter that is stuck in the oil cooler fins using compressed air.
Caution
|

- Reinstall the removed parts.
- Remove the oil cooler guard (4).

Installation
Install the oil cooler and oil cooler hoses in the reverse order of removal. Pay attention to the following points:
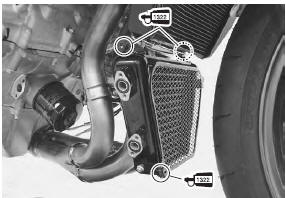
- apply thread lock to the oil cooler mounting bolt and tighten them securely.
 : Thread lock cement
99000–32110
(thread lock cement super “1322” or
equivalent)
- Apply engine oil to new o-rings.
| Caution replace the o-rings with new ones to prevent oil leakage. |


- Apply thread lock to the oil cooler hose bolts and tighten them securely
 : Thread lock cement
99000–32110
(thread lock cement super “1322” or
equivalent)

- Pour engine oil. Refer to “engine oil and filter replacement” in section 0b .
- Install the removed parts.
 Oil pressure regulator / oil strainer
inspection
Oil pressure regulator / oil strainer
inspection
Refer to “oil pan / oil pressure regulator / oil strainer removal and
installation” .
Oil pressure regulator
Inspect the operation of the oil pressure regulator by
pushing the piston with a prope ...
 Oil cooler / oil cooler hose removal and
installation
Oil cooler / oil cooler hose removal and
installation
Refer to “electrical components location” in section 0a .
Removal
Turn the ignition switch off.
Remove the left side cowling. Refer to “exterior parts removal and
installation” in sect ...
Other materials:
DTC “c40” (p0505 / p0506 / p0507): isc
valve circuit malfunction
Detected condition and possible cause
Detected condition
Possible cause
C40/P0505
The circuit voltage of motor drive is
unusual.
Isc valve circuit open or shorted to ground.
Air passage clogged.
Isc valve is fixed.
Isc valve prese ...
Starting the engine
Before attempting to start the
engine, make sure:
The transmission is in neutral.
The engine stop switch is in
the "" position.
Note: this motorcycle has a
starter interlock system for the
ignition and starter circuit. The
engine can only be started if:
...
Drive chain cleaning and lubricating
Clean and lubricate drive chain
every 1 000 km (600 miles)
Clean and lubricate the drive chain in the following
procedures:
clean the drive chain with kerosine. If the drive chain
tends to rust quickly, the intervals must be
shortened.
Caution
do not use trichloroethyle ...